SSH Authentication with Jsch

In this guide, you’ll learn how to integrate the Hardware Security SDK in your app to implement SSH authentication with security keys and smartcards. The Hardware Security SDK will automatically…
- retrieve the publickey from the security key and use it for the SSH connection.
(If an OpenSSH certificate has been stored on the security key, this will be used instead.) - cryptographically sign the SSH challenge using the security key.
Add the SDK to Your Project
To get a username and password for our Maven repository, please contact us for a license.
Add this to your build.gradle:
repositories {
    google()
    jcenter()
    maven {
        credentials {
            username 'xxx'
            password 'xxx'
        }
        url "https://maven.cotech.de"
    }
}

dependencies {
    // For use with OpenPGP Cards
    implementation 'de.cotech:hwsecurity-openpgp:4.4.0'
    // Or with PIV cards
    //implementation 'de.cotech:hwsecurity-piv:4.4.0'

    // Jsch bridge
    implementation 'de.cotech:hwsecurity-ssh:4.4.0'

    // Jsch library
    implementation 'com.jcraft:jsch:0.1.55'
}
Initialize the Hardware Security SDK
To use the SDK’s functionality in your app, you need to initialize the SecurityKeyManager first.
This is the central class of the SDK, which dispatches incoming NFC and USB connections.
Perform this initialization in the onCreate method of your Application subclass.
This ensures Security Keys are reliably dispatched by your app while in the foreground.
We start by creating a new class which extends android.app.Application as follows:
class MyCustomApplication : Application() {
    override fun onCreate() {
        super.onCreate()

        val securityKeyManager = SecurityKeyManager.getInstance()
        val config = SecurityKeyManagerConfig.Builder()
            .setEnableDebugLogging(BuildConfig.DEBUG)
            .build()
        securityKeyManager.init(this, config)
    }
}
public class MyCustomApplication extends Application {
    @Override
    public void onCreate() {
        super.onCreate();

        SecurityKeyManager securityKeyManager = SecurityKeyManager.getInstance();
        SecurityKeyManagerConfig config = new SecurityKeyManagerConfig.Builder()
            .setEnableDebugLogging(BuildConfig.DEBUG)
            .build();
        securityKeyManager.init(this, config);
    }
}
Then, register your MyCustomApplication in your AndroidManifest.xml:
<application
    android:name=".MyCustomApplication"
    android:label="@string/app_name"
...>
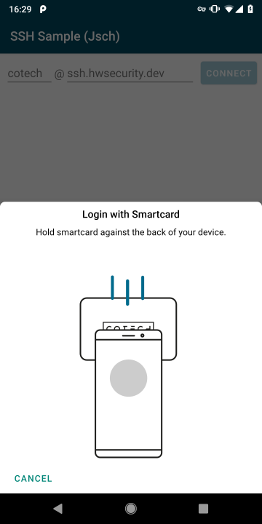
Show Security Key Dialog and Receive Callbacks
In this guide, we use the OpenPgpSecurityKeyDialogFragment to show a neat kepad for PIN input.
It also handles security key errors, for example when a wrong PIN is entered.
private fun showSecurityKeyDialog() {
    val options = SecurityKeyDialogOptions.builder()
        //.setPinLength(4) // security keys with a fixed PIN and PUK length improve the UX
        //.setPukLength(8)
        .setShowReset(true) // show button to reset/unblock of PIN using the PUK
        .build()

    val securityKeyDialogFragment = OpenPgpSecurityKeyDialogFragment.newInstance(options)
    // if you like to use PIV:
    //val securityKeyDialogFragment = PivSecurityKeyDialogFragment.newInstance(options)

    securityKeyDialogFragment.show(supportFragmentManager)
}
Implement SecurityKeyDialogCallback<OpenPgpSecurityKey> (or, if you are using PIV cards: SecurityKeyDialogCallback<PivSecurityKey>) in your Activity and override onSecurityKeyDialogDiscovered to receive callbacks from the securityKeyDialogFragment when a security key is discovered over NFC (or Security Keys over USB):
@UiThread
override fun onSecurityKeyDialogDiscovered(
    dialogInterface: SecurityKeyDialogInterface,
    securityKey: OpenPgpSecurityKey,
    pinProvider: PinProvider?
) {
    val loginName = "cotech"
    val loginHost = "ssh.hwsecurity.dev"

    connectToSsh(loginName, loginHost, dialogInterface, securityKey, pinProvider!!)
}
Threading and Exception Handling
The actual SSH connection is deferred to a new thread so that network operations are not blocking the main thread.
To properly handle Exceptions, deferred.await() is used.
IOExceptions are posted to the securityKeyDialogFragment using the SecurityKeyDialogInterface.postError() for user feedback.
private fun connectToSsh(
    loginName: String,
    loginHost: String,
    dialogInterface: SecurityKeyDialogInterface,
    securityKey: OpenPgpSecurityKey,
    pinProvider: PinProvider
) = GlobalScope.launch(Dispatchers.Main) {
    val deferred = GlobalScope.async(Dispatchers.IO) {
        val securityKeyAuthenticator = securityKey.createSecurityKeyAuthenticator(pinProvider)
        val securityKeySshAuthenticator = SecurityKeySshAuthenticator.fromPublicKey(securityKeyAuthenticator)
        // NOTE: If you are using OpenSSH certificates:
        //val securityKeySshAuthenticator = SecurityKeySshAuthenticator.fromOpenSshCertificate(securityKeyAuthenticator)

        val securityKeyIdentity = SecurityKeyJschIdentity(loginName, securityKeySshAuthenticator)

        jschConnection(dialogInterface, loginHost, securityKeyIdentity)
    }

    try {
        deferred.await()
    } catch (e: JSchException) {
        Log.e("SSH", "Exception", e)
        // wrap in IOException and show
        dialogInterface.postError(IOException(e.message))
        // unwrap IOExceptions thrown in SshIdentity and handle them in securityKeyDialogFragment
        e.cause?.let { dialogInterface.postError(it as IOException?) }
    } catch (e: IOException) {
        dialogInterface.postError(e)
    } catch (e: Exception) {
        Log.e("SSH", "Exception", e)
    }
}
SSH Identity
Using the SecurityKeySshAuthenticator, we can create a Jsch SSH Identity class that delegates the signature operation to the security key.
Special care needs to be taken due to Jsch’s exception handling.
Since Jsch swallows other exceptions happening during the authentication, we need to wrap IOExceptions happening during securityKeySshAuthenticator.authenticateSshChallenge() into a JschException.
These are catched during the SSH connection and unwrapped to properly delegate them to the securityKeyDialogFragment, as shown previously.
class SecurityKeyJschIdentity(
    private val loginName: String,
    private val securityKeySshAuthenticator: SecurityKeySshAuthenticator
) : Identity {
    override fun getName() = loginName
    override fun getAlgName() = securityKeySshAuthenticator.sshPublicKeyAlgorithmName
    override fun getPublicKeyBlob() = securityKeySshAuthenticator.sshPublicKeyBlob
    override fun getSignature(data: ByteArray?): ByteArray {
        // wrap IOExceptions thrown by authenticateSshChallenge() into JschExceptions to handle them later in securityKeyDialogFragment
        try {
            return securityKeySshAuthenticator.authenticateSshChallenge(data)
        } catch (e: IOException) {
            throw JSchException("IOException", e)
        }
    }

    override fun clear() {}
    override fun isEncrypted() = false
    override fun setPassphrase(passphrase: ByteArray?) = true
    override fun decrypt() = true
}
Jsch SSH Connection
The actual SSH connection can be done according to the Jsch documentation.
After successfull authentication, securityKeyDialogFragment must be dismissed manually.
@WorkerThread
private fun jschConnection(
    dialogInterface: SecurityKeyDialogInterface,
    loginHost: String,
    securityKeyIdentity: SecurityKeyJschIdentity
) {
    val jsch = JSch()
    // disable strict host key checking for testing purposes
    JSch.setConfig("StrictHostKeyChecking", "no")
    jsch.addIdentity(securityKeyIdentity, null)
    val sshSession = jsch.getSession(securityKeyIdentity.name, loginHost)

    val baos = ByteArrayOutputStream()
    baos.write("Server Output: ".toByteArray(), 0, 15)

    sshSession.connect(10000)

    val channel = sshSession.openChannel("shell")
    channel.outputStream = baos
    channel.connect(10000)

    // close dialog after successful authentication
    dialogInterface.dismiss()
    Log.d("SSH", "SSH connection successful!")
    Log.d("SSH", "")
    Log.d("SSH", baos.toString())
}
Prevent Re-Creation of Activity with USB Security Keys
Besides the functionalities used by our SDK, some Security Keys register themselves as USB keyboards to be able to insert One Time Passwords (OTP) when touching the golden disc. Thus, when inserting a Security Key into the USB port, Android recognizes a new keyboard and re-creates the current activity.
To prevent this, add keyboard|keyboardHidden to the activity’s configChanges in your AndroidManifest.xml:
<activity
    android:name=".MyCustomActivity"
    android:configChanges="keyboard|keyboardHidden"
... >
ssh.hwsecurity.dev Test Server
To test your implementation, we provide a SSH test server at ssh.hwsecurity.dev.
When logging in with the username cotech, it simply returns the used SSH algorithm and public key.
If an OpenSSH certificate is used, it is returned instead.
Public Key
Try it with your OpenSSH client first:
user@laptop:~$ ssh cotech@ssh.hwsecurity.dev

Hardware Security SDK - SSH Sample

You are using a publickey (not certificate) with type:
ssh-rsa

Your full key is:
AAAAB3NzaC1yc2EAAAADAQABAAABAQC2mh1oganCTRdymQn864LQHkibEyyeC26I5FF4NLv03QU0OxR
iIS3iLpZXJA+hL4ARBDxMWeYnytcgj2n9PLiOLJijgTyfEqVBAp7HpqnXxcKLj+cl4LpBhs81nfdeN1
osNkpsdb7J2ZprSIh8eweIw1ZLB1s6J3FQcxhOfo1I0VYV4u512ra6+13w6CvFqqbAyx9VgvNfNB9LV
rgHP0QWFs7qhtj+wWIS835R5sOiwwC2ELN2nEZKsOlQrp/Um4uFoD/UUqiqznZVNW3l8yKEWTE4jVUg
txg0iFoBqDBKk5N/2z4jUz4MaKZ0LPhlp3hL/E0sDifMwtLxziawaRJn


Bye!

Connection to ssh.hwsecurity.dev closed.
Certificate
When enforcing the use of OpenSSH certificates, the certificate is returned:
user@laptop:~$ ssh cotech@ssh.hwsecurity.dev -i user -o CertificateFile=user-cert.pub

Hardware Security SDK - SSH Sample

You are using a certificate with type:
ssh-rsa-cert-v01@openssh.com

Your full certificate is:
AAAAHHNzaC1yc2EtY2VydC12MDFAb3BlbnNzaC5jb20AAAAgqAYx2y4vpU40SqMdOZ2rMyNpIORMYT2
RJHh7xf7yiygAAAADAQABAAABAQC2mh1oganCTRdymQn864LQHkibEyyeC26I5FF4NLv03QU0OxRiIS
3iLpZXJA+hL4ARBDxMWeYnytcgj2n9PLiOLJijgTyfEqVBAp7HpqnXxcKLj+cl4LpBhs81nfdeN1osN
kpsdb7J2ZprSIh8eweIw1ZLB1s6J3FQcxhOfo1I0VYV4u512ra6+13w6CvFqqbAyx9VgvNfNB9LVrgH
P0QWFs7qhtj+wWIS835R5sOiwwC2ELN2nEZKsOlQrp/Um4uFoD/UUqiqznZVNW3l8yKEWTE4jVUgtxg
0iFoBqDBKk5N/2z4jUz4MaKZ0LPhlp3hL/E0sDifMwtLxziawaRJnAAAAAAAAAAAAAAABAAAADHVzZX
Jfc2NodWVybQAAABgAAAAGZXhjZWV0AAAACnByaW5jaXBhbDIAAAAAXPp6EAAAAABe2lxQAAAAAAAAA
IIAAAAVcGVybWl0LVgxMS1mb3J3YXJkaW5nAAAAAAAAABdwZXJtaXQtYWdlbnQtZm9yd2FyZGluZwAA
AAAAAAAWcGVybWl0LXBvcnQtZm9yd2FyZGluZwAAAAAAAAAKcGVybWl0LXB0eQAAAAAAAAAOcGVybWl
0LXVzZXItcmMAAAAAAAAAAAAAARcAAAAHc3NoLXJzYQAAAAMBAAEAAAEBAMHqBORhry24p942rZFm0B
oGi2GyyykmFCphNnW4JbdVrg1fsS0wTPqP1NhCHIj6GHiYmXIFS++ttW/pxkTEqX0IUw62d3mukKFXX
FM1XQyYCDocFN3eWQxmcuShktiNXKbQTjnL793NiKPa3Q13T5CPCSMZYBLs0Jd+xVfMEENfGTDf3I4D
9fhpNvVtoJds21X/5BMYSqPO5RJ8utAHsv5J4pJ2n2BlyfgbgfJQ3AJs9aQk6auO0S1WbklMRZCQ2Dv
n1oi9jSvs+/HycGTmw+NJz+7EQm963MZAqIq1wMBx9wRwEBJsB22pOAVRKBnn6JdoutkXeLqVL75xcg
CJIFMAAAEPAAAAB3NzaC1yc2EAAAEALmco/xfMvJSedpprEFG9W+9KdKq2U+x/yAvo4DgjjzAaioWgY
SDli2Sad1RsEOX8svxkUYSHB2puI9KZpoOfqOq7Rh5qKCXV9tSkl4+MAPlLTLay76ts0yyOj8ZEodHH
WuqP2XN0fKjqmPhsypQ07IVg83cHQaea9ZSEGfVpMYTReGy0x32IVM1o+yN4hplIIJ8bdIKySxfUaby
Q6qZQTDAE+2J46OCs4Pfj2dTVgYc2OCrb3BKEdi90PSd2s0v2Gld5/Xwl/u6QiY4Jue61hiVA3fEzbP
YCeMpI+SwXO8sjNW+psFdl0tm9RDC2mQtg21JnVlC7WtoYNEvkt7dr4w==


Bye!

Connection to ssh.hwsecurity.dev closed.
Congratulations!
That’s all! If you have any questions, don’t hesitate to contact us: